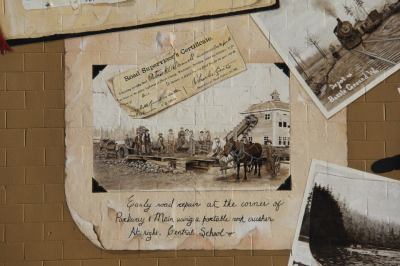
In 2008 I started a project and I’m STILL not finished! In my defense, it’s a BIG project, there’s fundraising and a committee involved. Here’s the story–
I’ll start by saying, this blog really isn’t about past work and what I used to do for a living. However, since this project has had me preoccupied lately I thought you might be interested. In 2008, just as I was entering the art world via murals and faux finishing, I was asked by Old Town Battle Ground Association to present 2-3 concepts for a mural to cover a 25′ x 100′ section of Andersen Dairy, which in its entirety takes up almost one whole city block. The subject matter was to depict the history of Battle Ground from its inception, how it got its name, its industries through the years, as well as significant events or places that are unique to this small town. To complicate it even more, since this is Main Street we’re talking about, the sidewalks had to remain available for foot traffic at all times and I needed to design it so it could be done in three phases. I’ll tell you more about the process I used as the blog progresses.
The theme Scrapbook In Time was chosen. The idea was to depict a scrapbook being made with the pile of pictures getting caught up in the wind and blowing across the building. The pictures get larger as they become more current and progress through the decades from sepia tones to full color.
It wasn’t long before I began to get unnerved by the enormity of the undertaking, especially when I started the research. There were so many decisions before I could even start painting. The mural committee, made up of myself and 4, or was it 5 others, decided the most important themes we would cover by decade, then I would search for appropriate pictures, bring them back and the committee would decide what made the final cut. While I searched through micro-fish at the library, went through piles of images from different sources and devoured the book Battle Ground and Around, a fascinating book written by local historian and GFWC member, Louise Tucker, the rest of the committee began advertising the project and raising funds.
We were fortunate to raise the funds for the first phase of the project–before the economy took a dive–and I was able to begin painting. Here are a few photos of the first phase.


As you could see from the closeups, the mural appears to be painted directly on the surface, especially since you can see all the ridges from the cinder block wall. Actually, these were all painted off-site and installed like wallpaper. I discovered the process just as I was planning the mural and it opened the doors of possibility for design. I had gone to a Cascade Artisan Guild meeting in Portland. The late Larry Kangas, an amazing and prolific muralist from Portland, was presenting a method he’d learned from a California muralist (I don’t remember who it was or I’d give him a shout out). The materials used are, heavy weight pellon or interfacing for those seamstresses out there and liquid matte medium (LMM). The LMM is used to seal the otherwise porous pellon. Check out the process below:


Yes, the ink ran when I installed the first newspaper. Keep in mind, you can read every word on the newspaper, which means, there was a lot of work involved (and to let you in on a secret–I really hate lettering). To make the work easier I thought I’d use water-soluble ink pens. Bad decision! Even after painting a sealer over it 3 times and simulating my own rainstorm “test” in the barn, somehow, it still did not work. Mercifully, a thunderstorm with wind and huge raindrops rolled in just as I began to install the 10′ long newspaper. I had to return the lift the next day so I had to get it done. Just as I finished the installation, which consisted of painting heavy matte medium on the wall and rolling each section of the newspaper on like wallpaper, the first raindrops fell and the first streak of black ink began to roll down the face of the newspaper, threatening to spoil the logging truck painting below. The heavy matte medium was already setting up so as quickly as I could in a lift, I pulled and yanked and dropped all the mess to the ground, wiping as much of the residue off as possible so it didn’t look horrible until I was able to get the next one done. I say it worked out well because it needed to be larger so I expanded it by 2′. Also, the lettering was done with brushes and acrylic paint–running is not an option!
This post is getting long so I’ll post a couple more pictures and call it good. There is one more painting to add just below the Central Park pictures, as well as a few pieces tucked in here and there to give better clarification to the pictures and to balance out the composition. Hopefully, funding comes in VERY soon and I can get it completed before Harvest Days this year, which are in mid-July. This means, funding needs to come in within the next week or two at the latest. I’ll keep you posted if I get the new installations in.


Nice woirk. Good luck with it all.
Thank you Sherry!
Love your work! Thanks for sharing!
Thank you!!!